Configuring Azure AD SSO integration with Certificate Manager - SaaS
If Azure AD is your SSO solution, this topic shows you how to integrate Azure with Certificate Manager - SaaS.
Certificate Manager - SaaS can be integrated with Azure AD to enable SSO for users who are managed by Azure AD (and any on-prem Active Directory forests that are synchronized with Azure AD). You do this by registering Certificate Manager - SaaS as an enterprise application in your Azure AD tenant.
To set up this integration, first create an app registration for Certificate Manager - SaaS in Azure AD. Open the Azure AD portal and Certificate Manager - SaaS side by side to complete this setup faster.
Create a new Azure tenant
Create a new, dedicated Azure AD tenant for Certificate Manager - SaaS. This integration requires a dedicated tenant and does not support reusing a tenant that you already configured for another application.
Group information and OIDC tokens
You can also configure Azure AD to include user group information in OIDC tokens, and then configure Certificate Manager - SaaS with the URLs and client ID/secret needed to interface with Azure AD.
Azure AD does not support requesting custom scopes to alter the claims returned in OIDC tokens. So, when using Azure AD, be sure to leave the Scopes field on Certificate Manager - SaaS's SSO configuration page blank.
- Configure Azure AD and Certificate Manager - SaaS to work together
- Test the connection between Certificate Manager - SaaS and Azure AD
- (Optional) Add a Groups claim
Step 1: Configuring Azure AD to work with Certificate Manager - SaaS
-
Sign in to Azure as a directory administrator (or another user who can create app registrations in your Azure AD tenant).
-
Go to App registrations and click New registration.
-
Type a name for the application (such as Certificate Manager - SaaS), and then configure supported account types.
-
Sign in to Certificate Manager - SaaS.
- Click Settings > Single Sign-On.
-
Copy the Redirect URL from the SSO configuration page and paste it into the Redirect URI in Azure.
After you complete registration, Azure opens the app registration page for the Certificate Manager - SaaS application you created.
Next, create a client secret that Certificate Manager - SaaS uses to authenticate with Azure AD.
-
Back in Certificate Manager - SaaS, copy the SSO Login URL from the Single Sign-On page.
-
In Azure, go to Branding and properties and paste the copied SSO Login URL into Home Page URL.
-
In Azure, go to Certificates & secrets, click New client secret, and then give your secret a description and specify its lifetime.
Tip
Give the secret a useful description, such as Secret used by the Certificate Manager - SaaS application, to make it easier to identify later.
If you use expiring client secrets, renew them and update Certificate Manager - SaaS with the new secret.
-
After creating the secret, copy the new secret's value (not the Secret ID), and then in Certificate Manager - SaaS, paste it into the Client Secret field on the SSO Configuration page.
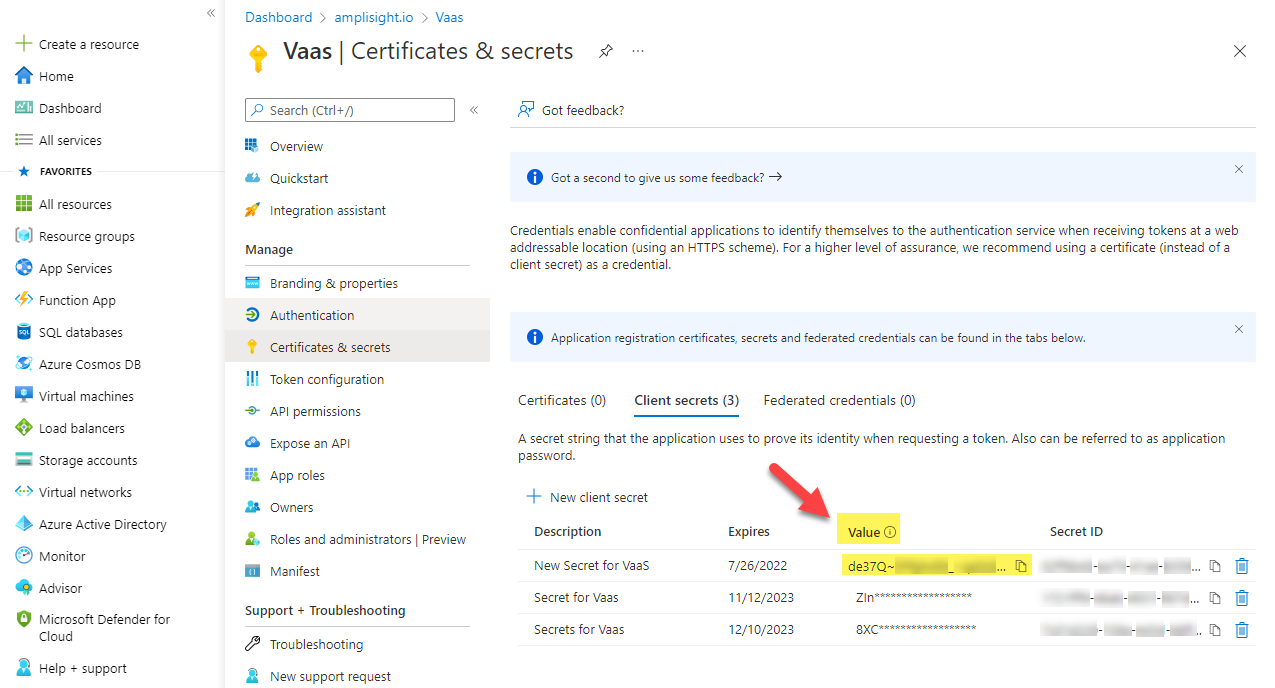
Tip
After you leave the app registration blade, Azure hides the client secret value. Save the secret value in a secure password vault if you need it later.
-
In Azure, go to the Overview section in the App registration blade.
-
Copy the Application (client) ID and then in Certificate Manager - SaaS, paste it into the Client ID field on the SSO Configuration page.
-
In Azure, from the Overview section of the App registration blade, click Endpoints.
This shows you the set of endpoints on which Azure AD provides OAuth/OIDC services.
-
From the OpenID Connect metadata document field, select and copy only the following portion of the URL:
https://login.domain.com/XXXXX-XXXXX-XXXX-XXXXXXXXX/v2.0(excluding/.well-known/openid-configuration).Example
If the full URL were
https://login.microsoftonline.com/XXXXX-XXXXX-XXXX-XXXXXXXXX/v2.0/.well-known/openid-configuration, then you select and copyhttps://login.microsoftonline.com/XXXXX-XXXXX-XXXX-XXXXXXXXX/v2.0only, and paste it into the Issuer URL field on Certificate Manager - SaaS's SSO Configuration page. -
Back in Certificate Manager - SaaS, paste the URL portion you copied into the Issuer URL field on the SSO configuration page.
You are done configuring the Certificate Manager - SaaS application in Azure AD. Next, test the connection.
Step 2: Testing the connection between Certificate Manager - SaaS and Azure AD
-
From Certificate Manager - SaaS's Single Sign-On page, click Test Connection.
-
When prompted, type your enterprise credentials into Azure AD.
When authentication succeeds, Azure redirects you back to the Certificate Manager - SaaS SSO Configuration page. From there, you can view the claims returned in the OIDC token that Azure AD issues.
-
Save your SSO configuration.
Your users can now sign in using their SSO credentials.
Step 3: Adding a Groups claim (Optional)
A groups claim lets Azure AD send group membership information to Certificate Manager - SaaS. Group claims let you use the Teams feature in Certificate Manager - SaaS to add users to Teams and assign roles based on your organization's requirements.
-
In Azure AD, from the Certificate Manager - SaaS App registration blade, click Token configuration, and then click Add groups claim.
-
Select the group types to include in the claim.
Tip
In most cases, select All groups. If you have many groups in Azure AD, send only those assigned to the application. This approach lets you specify the groups relevant for Certificate Manager - SaaS at the registration level so that the groups returned in a user's group claims are limited to just those that are explicitly assigned to the application.
-
Select ID from the Customize token properties by type section, and then select one of the options to indicate the format of the group name to be returned.
For simple Azure AD deployments, sAMAccountName is sufficient.
-
Click Add.
-
In Certificate Manager - SaaS, from the Single Sign-On page, below the Scopes field, click Test Connection to verify that you now have a new claim called groups that returns the user groups to which the user is assigned in Azure AD.