Connecting a cluster to Certificate Manager - SaaS by installing Discovery Agent
The Discovery Agent for CyberArk Certificate Manager in Kubernetes and OpenShift Environments (formerly known as Venafi Kubernetes Agent) connects your Kubernetes or OpenShift cluster to CyberArk Certificate Manager - SaaS. You will require a Certificate Manager - SaaS account to connect your cluster.
To learn more, see Discovery Agent network requirements.
You can connect a cluster to Certificate Manager - SaaS using the CLI tool for CyberArk Certificate Manager in two ways:
- By using the
venctl installation cluster connectcommand, which is convenient for quick interactive connections of a small number of clusters. - By using Manifest tool for CyberArk Certificate Manager. This is the recommended option when you want to integrate the connection process into your CI/CD pipelines.
Important
If you use your own registry, which replicates the CyberArk images, replace the address of your own registry in any of the relevant commands given on this page.
Prerequisites
You need cluster level access, including the permissions to install new components.
To connect a cluster and authenticate it using workload identity federation
Connecting a cluster and authenticating it using workload identity federation involves five steps:
- Create a Helm values file.
- Install Discovery Agent using the CLI tool for CyberArk Certificate Manager
- Obtaining the OIDC Issuer URL and JWKS URI.
- Creating a service account in the Certificate Manager - SaaS UI.
- Configuring Kubernetes resources.
Step 1: Create a values file
First, create a venafi-kubernetes-agent.values.yaml to define Helm values for the Connection resource for Certificate Manager - SaaS:
config:
  clusterName: "replace-with-your-cluster-name"
  clusterDescription: "replace-with-your-cluster-description"
authentication:
  venafiConnection:
    enabled: true
Step 2: Install Discovery Agent
-
If not already installed, download and install the relevant version of the CLI tool for CyberArk Certificate Manager for your platform.
-
Install the latest version of Discovery Agent:
venctl components kubernetes manifest generate \
  --venafi-kubernetes-agent \
  --venafi-kubernetes-agent-values-files venafi-kubernetes-agent.values.yaml > venafi-agent.yaml.gotmpl

venctl components kubernetes manifest tool sync \
  --file venafi-agent.yaml.gotmpl
Step 3: Obtaining the OIDC Issuer URL and JWKS URI
Before creating a service account in Certificate Manager - SaaS, you must complete the following tasks on your Kubernetes cluster.
-
Obtain the OIDC Issuer URL: To get the OIDC Issuer URL, run the command below
kubectl get --raw /.well-known/openid-configuration | jq -r '.issuer' -
Obtain the OIDC JWKS URI: To get the OIDC JWKS URI, run the command below
ISSUER_URL=$(kubectl get --raw /.well-known/openid-configuration | jq -r '.issuer')
curl -fsSL "${ISSUER_URL}/.well-known/openid-configuration" | jq -r '.jwks_uri'
IMPORTANT!
The JWKS URI must be a publicly accessible HTTPS endpoint, without authentication. This allows Certificate Manager - SaaS to retrieve authentication information. If the JWKS URI isn't publicly accessible or if it is protected, you must establish an alternative location that is kept in constant synchronization with the original JWKS URI of your cluster.
For example, on a Google GKE cluster, the public JWKS URI can be found in the public discovery document rather than the in-cluster discovery document:
https://container.googleapis.com/v1/projects/${PROJECT_ID}/locations/${LOCATION}/clusters/${CLUSTER_NAME}/.well-known/openid-configuration. Learn more
Step 4: Creating a service account in the Certificate Manager - SaaS UI
Warning
When registering clusters with Certificate Manager - SaaS, ensure that only one instance of the Discovery Agent is deployed per cluster. Additionally, each instance of the Discovery Agent must use a dedicated Certificate Manager - SaaS service account. This practice allows Certificate Manager - SaaS to accurately identify connected clusters. Using the same service account across multiple clusters is not supported.
- Sign in to Certificate Manager - SaaS.
-
Click Settings > Service Accounts.
-
Click New.
-
Select the Kubernetes Agent radio button in the Use Case list, and click Continue.
-
Enter a Name for your new service account.
-
Select an Owning Team. This team owns the machine you want to create the service account for.
-
Enter the Validity period in days for the service account.
-
Select Kubernetes Discovery for the Scope if not already selected.
-
Select Workload Identity Federation as the authentication method, and then click Continue.
-
Fill in the credentials with the specific information required for authentication, and then click Finish:
-
Issuer URL: Enter the OIDC Issuer URL of the cluster obtained in the previous section.
- Example:
https://kubernetes.default.svc
- Example:
-
JWKS URI: Enter the OIDC JWKS URI of the cluster or the public location where the JSON Web Key Set (JWKS) data is replicated.
- Example:
https://www.example.com:6443/.well-known/jwks.json
- Example:
-
Subject Identifier: Enter the unique identifier for the subject within the issuing authority's namespace. Kubernetes uses the format
system:serviceaccount:<NAMESPACE>:<SERVICE ACCOUNT NAME>for the Subject Identifier field.- Example:
system:serviceaccount:venafi-agent
- Example:
-
Audience: Enter the intended audience for the token, which is usually the API or resource that the token is intended to access.
- Examples:
https://api.venafi.cloud,https://api.au.venafi.cloud, orhttps://api.eu.venafi.cloud
- Examples:
-
-
Create the
venafinamespace in your cluster:kubectl create namespace venafi -
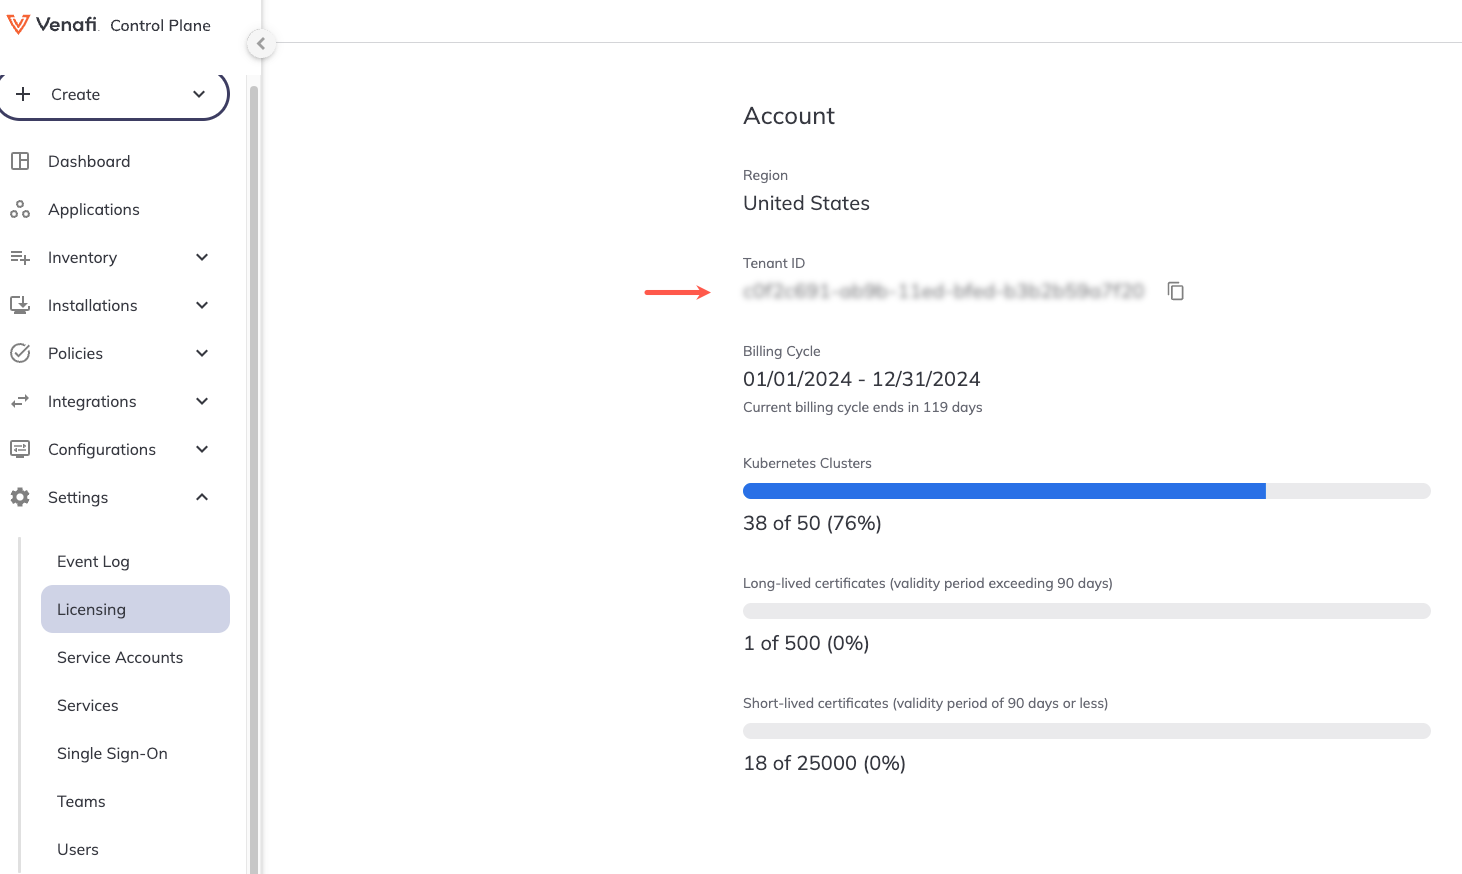
Retrieve your tenant ID in the Certificate Manager - SaaS UI by navigating to Settings > Licensing. Your Tenant ID will be displayed under Account information on the Licensing page.
-
Create a Connection resource in YAML. For example:
apiVersion: jetstack.io/v1alpha1 kind: VenafiConnection metadata: name: venafi-agent namespace: venafi spec: vcp: url: https://api.venafi.cloud accessToken: - serviceAccountToken: name: venafi-agent audiences: ["https://api.venafi.cloud"] - vcpOAuth: tenantID: xxxxxxxx-xxxx-xxxx-xxxx-xxxxxxxxxxxx # (1)!- Add the tenant ID here that you retrieved in the previous step.
The above example uses the US region Certificate Manager - SaaS API URL, you can also substitute one of the following regional URLs if appropriate:
- EU region -
https://api.venafi.eu - UK region -
https://api.uk.venafi.cloud - Australia region -
https://api.au.venafi.cloud - Canada region -
https://api.ca.venafi.cloud - Singapore region -
https://api.sg.venafi.cloud
Step 5: Configuring Kubernetes resources
-
Create a Kubernetes service account that the Connection for CyberArk Certificate Manager can use to authenticate to Certificate Manager - SaaS.
apiVersion: v1 kind: ServiceAccount metadata: name: venafi-agent namespace: venafi -
Give the Connection resource the permission to acquire tokens for this service account:
-
Create a role that allows the creation of service account tokens for
venafi-agent:apiVersion: rbac.authorization.k8s.io/v1 kind: Role metadata: name: venafi-agent-create-token namespace: venafi rules: - apiGroups: [ "" ] resources: [ "serviceaccounts/token" ] verbs: [ "create" ] resourceNames: [ "venafi-agent" ] -
Link the Connection resource service account (which is used by Discovery Agent for authentication) to the
venafi-agent-create-tokenrole:apiVersion: rbac.authorization.k8s.io/v1 kind: RoleBinding metadata: name: venafi-agent-create-token namespace: venafi roleRef: apiGroup: rbac.authorization.k8s.io kind: Role name: venafi-agent-create-token subjects: - kind: ServiceAccount name: venafi-connection namespace: venafi
-
To connect a cluster using the venctl installation cluster connect command
- Download and install the appropriate version of the CLI tool for CyberArk Certificate Manager for your platform.
- Choose your tenant's region and then follow the instructions.
-
Connect a cluster by executing the appropriate region-specific command:
venctl installation cluster connect --name "replace-with-your-cluster-name" --vcp-region us --api-key xyzTo use a different Certificate Manager - SaaS region with command, replace
--vcp-region uswith one of the following as appropriate:- EU region -
--vcp-region eu - UK region -
--vcp-region uk - Australia region -
--vcp-region au - Canada region -
--vcp-region ca - Singapore region -
--vcp-region sg
venctl installation cluster connect --name "replace-with-your-cluster-name" --helm-chart-repository oci://myregistry.example.com/charts --image-registry myregistry.example.com/venafi-agent --api-key xyz - EU region -
Consider using the following additional flags:
| Flag | Type | Description |
|---|---|---|
--description | string | A textual description for the cluster resource. |
--owning-team | string | The team set as owner of the cluster resource. The team can be passed as names or IDs. |
--kubeconfig | string | The path to the kubeConfig file you want to use to connect to the cluster. |
--kubeconfig-context | string | The name of the kubeConfig file context you want to use to connect to the cluster. |
--image-pull-secret | string | The name of the Kubernetes image pull secret to use if the agent's image is hosted in a protected registry. |
Tip
You can also use the venctl components kubernetes apply command to install this component on a Kubernetes cluster quickly and easily for test purposes. Note that this command is not recommended for use in production environments.
See venctl components kubernetes apply for more information on how to use the command with this component.
To connect a cluster using Manifest tool
You also need to have kubectl and jq installed for this procedure.
- Download and install the appropriate version of the CLI tool for CyberArk Certificate Manager for your platform.
-
Choose your tenant's region and then follow the instructions.
-
Create a service account if you have not already done so, for example:
Warning
When registering clusters with Certificate Manager - SaaS, ensure that only one instance of the Discovery Agent is deployed. Additionally, each instance of the Discovery Agent must use a dedicated Certificate Manager - SaaS service account. This practice allows Certificate Manager - SaaS to accurately identify connected clusters. Using the same service account across multiple clusters is not supported.
venctl iam service-account agent create --name sa-agent \
  --output secret \
  --output-file agent-credentials.json \
  --api-key xyz

export VENAFI_KUBERNETES_AGENT_CLUSTER_NAME=<my-cluster-name>

export VENAFI_KUBERNETES_AGENT_CLIENT_ID=$(jq -r '.client_id' agent-credentials.json)
jq -r '.private_key' agent-credentials.json > venafi-agent-private-key-secret.yaml
Tip
The above example uses the default Certificate Manager - SaaS US region. If you wish to use another region add one of the following options:
- EU region -
--vcp-region eu - UK region -
--vcp-region uk - Australia region -
--vcp-region au - Canada region -
--vcp-region ca - Singapore region -
--vcp-region sg
- EU region -
-
Create the
venafinamespace, and a Kubernetes secret containing the private key of the desired service account.kubectl create namespace venafi kubectl apply --namespace venafi -f venafi-agent-private-key-secret.yaml -
Create a file called:
venafi-kubernetes-agent.values.yamlcontaining the following content if you want to add a cluster description. This step optional and can be omitted if you do not want to add a cluster description:config: clusterDescription: "replace-with-your-cluster-description"Using a custom CA bundle
-
If you want to employ a custom CA bundle, use
kubectlto add it to a ConfigMap:kubectl --namespace venafi create configmap ca-cert --from-file=ca-cert=<file-name> -
Configure the
volumesandvolumeMountsin thevenafi-kubernetes-agent.values.yamlfile. A values file is required if you are using a custom CA bundle:venafi-kubernetes-agent.values.yaml... volumes: - name: ca-cert configMap: name: ca-cert volumeMounts: - name: ca-cert mountPath: /etc/ssl/certs/ca-cert.crt subPath: ca-cert.crt readOnly: trueNote that this functionality is only available in release 0.1.49 or later.
-
-
Enter the following command to install the latest default version of the Discovery Agent.
venctl components kubernetes manifest generate \
  --venafi-kubernetes-agent \
  --venafi-kubernetes-agent-values-files venafi-kubernetes-agent.values.yaml > venafi-agent.yaml.gotmpl

venctl components kubernetes manifest tool sync \
  --file venafi-agent.yaml.gotmpl
Note
You can omit the
--venafi-kubernetes-agent-values-files venafi-kubernetes-agent.values.yamlflag here if you don't require a cluster description as shown above.
-
Create a service account if you have not already done so, for example:
Warning
When registering clusters with Certificate Manager - SaaS, ensure that only one instance of the Discovery Agent is deployed. Additionally, each instance of the Discovery Agent must use a dedicated Certificate Manager - SaaS service account. This practice allows Certificate Manager - SaaS to accurately identify connected clusters. Using the same service account across multiple clusters is not supported.
venctl iam service-account agent create --name sa-agent \ --output secret \ --output-file agent-credentials.json \ --api-key xyz export VENAFI_KUBERNETES_AGENT_CLUSTER_NAME=<my-cluster-name> export VENAFI_AGENT_CLIENT_ID=$(jq -r '.client_id' agent-credentials.json) jq -r '.private_key' agent-credentials.json > venafi-agent-private-key-secret.yaml -
Create the
venafinamespace, and a Kubernetes secret containing the private key of the desired service account.kubectl create namespace venafi kubectl apply --namespace venafi -f venafi-agent-private-key-secret.yaml -
Create a file called:
venafi-kubernetes-agent.values.yamlcontaining the following content:config: clusterDescription: "replace-with-your-cluster-description"Using a custom CA bundle
-
If you want to employ a custom CA bundle, use
kubectlto add it to a ConfigMap:kubectl --namespace venafi create configmap ca-cert --from-file=ca-cert=<file-name> -
Configure the
volumesandvolumeMountsin thevenafi-kubernetes-agent.values.yamlfile. A values file is required if you are using a custom CA bundle:venafi-kubernetes-agent.values.yaml... volumes: - name: ca-cert configMap: name: ca-cert volumeMounts: - name: ca-cert mountPath: /etc/ssl/certs/ca-cert.crt subPath: ca-cert.crt readOnly: trueNote that this functionality is only available in release 0.1.49 or later.
-
-
Enter the following command to install the latest default version of the Discovery Agent.
venctl components kubernetes manifest generate \
  --venafi-kubernetes-agent \
  --venafi-kubernetes-agent-values-files venafi-kubernetes-agent.values.yaml \
  --venafi-kubernetes-agent-custom-chart-repository oci://myregistry.example.com/charts \
  --venafi-kubernetes-agent-custom-image-registry myregistry.example.com/venafi-agent > venafi-agent.yaml.gotmpl

venctl components kubernetes manifest tool sync \
  --file venafi-agent.yaml.gotmpl
Note
You can omit the
--venafi-kubernetes-agent-values-files venafi-kubernetes-agent.values.yamlflag here if you don't require a cluster description as shown above.
-
For further information on installing the Discovery Agent using the CLI tool for CyberArk Certificate Manager, see the CLI tool for CyberArk Certificate Manager reference page.
Using a proxy server
Some Kubernetes clusters are configured to only allow Internet connections via a HTTP(S) proxy. If that applies to you:
- Add
api.venafi.cloudto the allowed domain list of your egress proxy if you are using the US region. If you are using the EU Certificate Manager - SaaS region, addapi.venafi.euinstead. - If you are installing Discovery Agent using the
venctl installation cluster connectcommand, add an HTTPS_PROXY environment variable to the PodTemplate of the Deployment resource of the Discovery Agent.
Verifying the deployment
To verify the deployment:
-
In the Certificate Manager - SaaS UI, click Installations > Kubernetes Clusters and verify the following for your cluster:
- Status: Active
- Last Check In: ... seconds ago
-
Click Settings > Event Log, and check that the following events are present for your service account:
- Service account access token granted
- Login succeeded
Tip
To troubleshoot any issues, use the following command to check the agent logs:
You should see something similar to the following:kubectl logs -n venafi -l app.kubernetes.io/instance=venafi-kubernetes-agent --tail -1 | grep -A 5 "Running Agent"2023/01/01 01:01:01 Running Agent... 2023/01/01 01:01:02 Posting data to: https://api.venafi.cloud/ or https://api.venafi.eu/ 2023/01/01 01:01:03 Data sent successfully.
Disconnecting a cluster and uninstalling Discovery Agent
To disconnect a cluster completely from Certificate Manager - SaaS, you must:
- Disconnect the cluster using the Certificate Manager - SaaS UI.
- Uninstall the Discovery Agent from the cluster.
Disconnecting a cluster using the Certificate Manager - SaaS web interface
To disconnect a cluster using the Certificate Manager - SaaS web interface, follow the instructions below:
- In the Certificate Manager - SaaS UI, go to Installations > Kubernetes Clusters.
- Click the checkbox on the row assigned to your cluster, and click Disconnect.
- Next, go to Settings > Service Accounts.
- Click the checkbox on the row assigned to the service account you created when installing Discovery Agent, and click Delete.
Uninstalling the Discovery Agent
To uninstall the Discovery Agent using kubectl, issue the following command:
kubectl delete -n venafi deployment agent