Installing Discovery Agent using the CyberArk Certificate Manager Operator
CyberArk Certificate Manager Operator for Red Hat OpenShift (formerly known as Venafi Control Plane Operator) is designed to assist customers in installing, maintaining, and upgrading CyberArk cluster components.
Follow the steps below to deploy the default version of cert-manager and Discovery Agent for CyberArk Certificate Manager in Kubernetes and OpenShift Environments (formerly known as Venafi Kubernetes Agent) using the CyberArk Certificate Manager Operator for Red Hat OpenShift.
Prerequisites
To install Discovery Agent using the CyberArk Certificate Manager Operator, you'll need to ensure you have the following:
- Access to the CyberArk OCI registry (or your own mirror).
- CyberArk Certificate Manager Operator already installed on your system.
- Red Hat OpenShift CLI tool
ocinstalled on your system.
Connecting a cluster using worker identity federation
Connecting a cluster and authenticating it using workload identity federation involves four steps:
- Install Discovery Agent.
- Obtaining the OIDC Issuer URL and JWKS URI.
- Creating a service account in the Certificate Manager - SaaS UI.
- Configuring Kubernetes resources.
Step 1: Install the Discovery Agent
-
Create a manifest
venafi-components.yaml.gotmpl. You can use one of the samples below as a basis:venafi-components.yaml.gotmplapiVersion: installer.venafi.com/v1alpha1 kind: VenafiInstall metadata: name: venafi-components spec: globals: enableDefaultApprover: false imagePullSecretNames: [venafi-image-pull-secret] namespace: venafi useFIPSImages: false vcpRegion: US region: US certManager: install: true skip: false version: v1.20.0 venafiKubernetesAgent: install: true values: tolerations: - key: node-role.kubernetes.io/infra operator: Exists effect: NoSchedule - key: node-role.kubernetes.io/private operator: Exists effect: NoSchedule config: clusterName: "replace-with-your-cluster-name" # (1)! clusterDescription: "replace-with-your-cluster-description" # (2)! authentication: venafiConnection: enabled: true version: 1.9.0- Friendly name for the cluster resource in Certificate Manager - SaaS.
- The textual description for the cluster resource.
Regional registries
The example above uses the Venafi US registry parameters. If you want to use a different Venafi registry replace
vcpRegion: USandregion: USwith the relevant regional repository value:-
EU registry
venafi-components.yaml.gotmpl... spec: globals: ... vcpRegion: EU region: EU ... -
UK registry
venafi-components.yaml.gotmpl... spec: globals: ... vcpRegion: UK region: EU ... -
Australia registry
venafi-components.yaml.gotmpl... spec: globals: ... vcpRegion: AU region: US ... -
Canada registry
venafi-components.yaml.gotmpl... spec: globals: ... vcpRegion: CA region: US ... -
Singapore registry
venafi-components.yaml.gotmpl... spec: globals: ... vcpRegion: SG region: US ...
For more information on Venafi OCI registries, see Configuring access to a Venafi OCI Registry.
- Friendly name for the cluster resource in Certificate Manager - SaaS.
- The textual description for the cluster resource.
venafi-components.yaml.gotmplapiVersion: installer.venafi.com/v1alpha1 kind: VenafiInstall metadata: name: venafi-components spec: globals: customChartRepository: oci://myregistry.example.com/charts customImageRegistry: myregistry.example.com enableDefaultApprover: false imagePullSecretNames: [venafi-image-pull-secret] namespace: venafi useFIPSImages: false certManager: install: true skip: false version: v1.20.0 venafiKubernetesAgent: install: true values: tolerations: - key: node-role.kubernetes.io/infra operator: Exists effect: NoSchedule - key: node-role.kubernetes.io/private operator: Exists effect: NoSchedule config: clusterName: "replace-with-your-cluster-name" # (1)! clusterDescription: "replace-with-your-cluster-description" # (2)! authentication: venafiConnection: enabled: true version: 1.9.0- Friendly name for the cluster resource in Certificate Manager - SaaS.
- The textual description for the cluster resource.
Tip
For a complete list of CyberArk Certificate Manager Operator configuration parameters, refer to the CyberArk Certificate Manager Operator API reference.
-
Apply the manifest by running the following command:
oc apply -f venafi-components.yaml.gotmpl
Step 2: Obtaining the OIDC Issuer URL and JWKS URI
Before creating a service account in Certificate Manager - SaaS, you must complete the following tasks on your Kubernetes cluster.
-
Obtain the OIDC Issuer URL: To get the OIDC Issuer URL, run the command below
kubectl get --raw /.well-known/openid-configuration | jq -r '.issuer' -
Obtain the OIDC JWKS URI: To get the OIDC JWKS URI, run the command below
ISSUER_URL=$(kubectl get --raw /.well-known/openid-configuration | jq -r '.issuer')
curl -fsSL "${ISSUER_URL}/.well-known/openid-configuration" | jq -r '.jwks_uri'
IMPORTANT!
The JWKS URI must be a publicly accessible HTTPS endpoint, without authentication. This allows Certificate Manager - SaaS to retrieve authentication information. If the JWKS URI isn't publicly accessible or if it is protected, you must establish an alternative location that is kept in constant synchronization with the original JWKS URI of your cluster.
For example, on a Google GKE cluster, the public JWKS URI can be found in the public discovery document rather than the in-cluster discovery document:
https://container.googleapis.com/v1/projects/${PROJECT_ID}/locations/${LOCATION}/clusters/${CLUSTER_NAME}/.well-known/openid-configuration. Learn more
Step 3: Create a service account in the Certificate Manager - SaaS UI
If you haven't already done so, create a service account in the Certificate Manager - SaaS UI and obtain the tenant ID.
- Sign in to Certificate Manager - SaaS.
-
Click Settings > Service Accounts.
-
Click New.
-
Select the Kubernetes Agent radio button in the Use Case list, and click Continue.
-
Enter a Name for your new service account.
-
Select an Owning Team. This team owns the machine you want to create the service account for.
-
Enter the Validity period in days for the service account.
-
Select Kubernetes Discovery for the Scope if not already selected.
-
Select Workload Identity Federation as the authentication method, and then click Continue.
-
Fill in the credentials with the specific information required for authentication, and then click Finish:
-
Issuer URL: Enter the OIDC Issuer URL of the cluster obtained in the previous section.
- Example:
https://kubernetes.default.svc
- Example:
-
JWKS URI: Enter the OIDC JWKS URI of the cluster or the public location where the JSON Web Key Set (JWKS) data is replicated.
- Example:
https://www.example.com:6443/.well-known/jwks.json
- Example:
-
Subject Identifier: Enter the unique identifier for the subject within the issuing authority's namespace. Kubernetes uses the format
system:serviceaccount:<NAMESPACE>:<SERVICE ACCOUNT NAME>for the Subject Identifier field.- Example:
system:serviceaccount:venafi-agent
- Example:
-
Audience: Enter the intended audience for the token, which is usually the API or resource that the token is intended to access.
- Examples:
https://api.venafi.cloud,https://api.au.venafi.cloud, orhttps://api.eu.venafi.cloud
- Examples:
-
-
Create the
venafinamespace in your cluster:kubectl create namespace venafi -
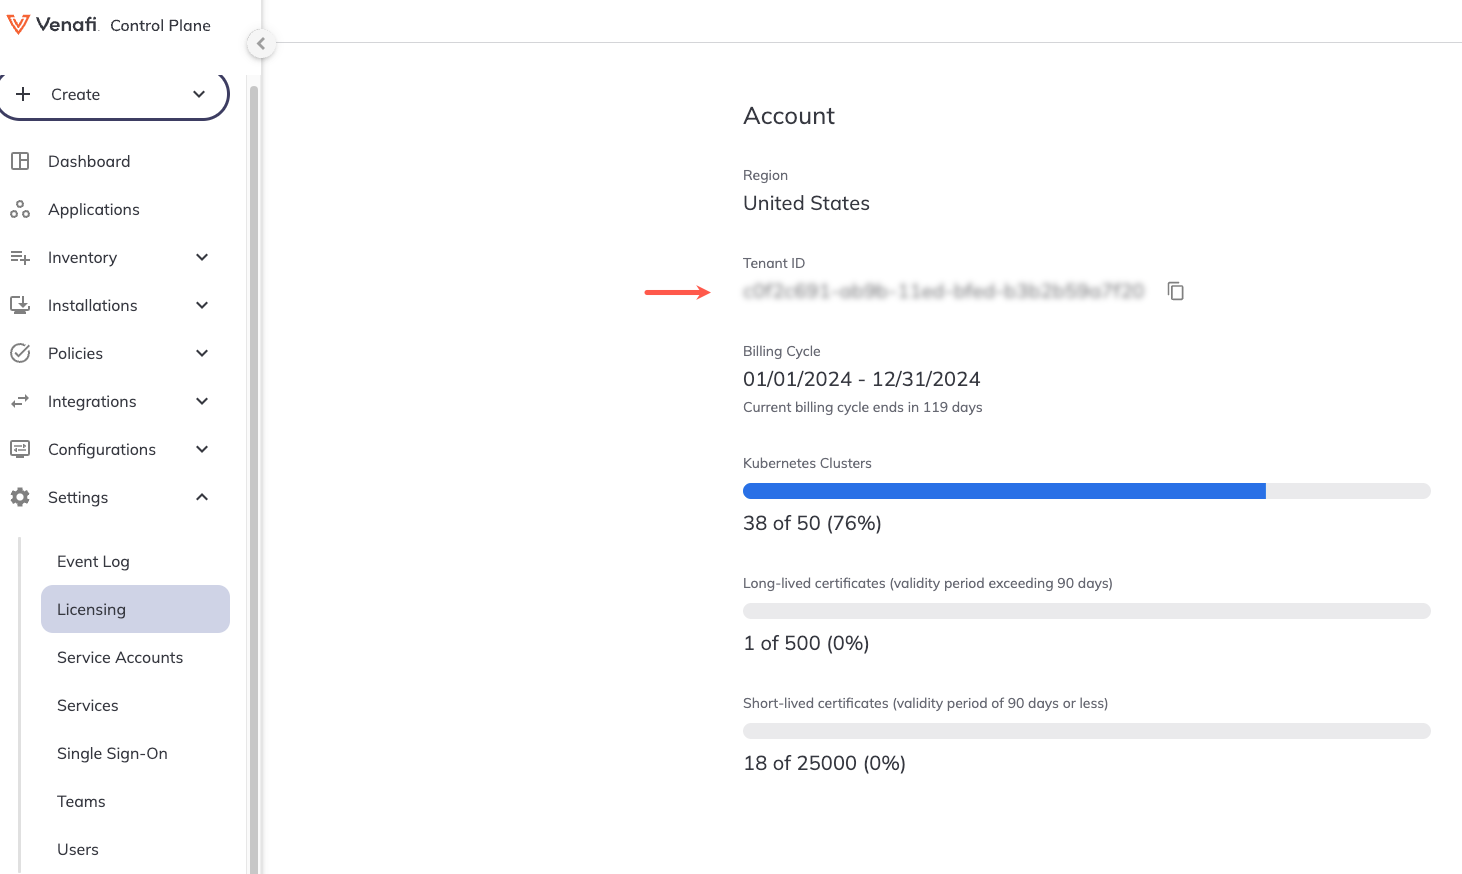
Retrieve your tenant ID in the Certificate Manager - SaaS UI by navigating to Settings > Licensing. Your Tenant ID will be displayed under Account information on the Licensing page.
-
Create a Connection resource in YAML. For example:
apiVersion: jetstack.io/v1alpha1 kind: VenafiConnection metadata: name: venafi-agent namespace: venafi spec: vcp: url: https://api.venafi.cloud accessToken: - serviceAccountToken: name: venafi-agent audiences: ["https://api.venafi.cloud"] - vcpOAuth: tenantID: xxxxxxxx-xxxx-xxxx-xxxx-xxxxxxxxxxxx # (1)!- Add the tenant ID here that you retrieved in the previous step.
The above example uses the US region Certificate Manager - SaaS API URL, you can also substitute one of the following regional URLs if appropriate:
- EU region -
https://api.venafi.eu - UK region -
https://api.uk.venafi.cloud - Australia region -
https://api.au.venafi.cloud - Canada region -
https://api.ca.venafi.cloud - Singapore region -
https://api.sg.venafi.cloud
Step 4: Configuring Kubernetes resources
-
Create a Kubernetes service account that the Connection for CyberArk Certificate Manager can use to authenticate to Certificate Manager - SaaS.
apiVersion: v1 kind: ServiceAccount metadata: name: venafi-agent namespace: venafi -
Give the Connection resource the permission to acquire tokens for this service account:
-
Create a role that allows the creation of service account tokens for
venafi-agent:apiVersion: rbac.authorization.k8s.io/v1 kind: Role metadata: name: venafi-agent-create-token namespace: venafi rules: - apiGroups: [ "" ] resources: [ "serviceaccounts/token" ] verbs: [ "create" ] resourceNames: [ "venafi-agent" ] -
Link the Connection resource service account (which is used by Discovery Agent for authentication) to the
venafi-agent-create-tokenrole:apiVersion: rbac.authorization.k8s.io/v1 kind: RoleBinding metadata: name: venafi-agent-create-token namespace: venafi roleRef: apiGroup: rbac.authorization.k8s.io kind: Role name: venafi-agent-create-token subjects: - kind: ServiceAccount name: venafi-connection namespace: venafi
-
Connecting a cluster using key pair service account authentication
Step 1: Configure access to the CyberArk OCI registry
Important
Follow the instructions in Configuring access to the OCI registry to enable access to the artifacts required for this component (cert-manager Components is the default scope for cert-manager). Use venafi as the namespace.
For the example below, it's assumed that you created the following Kubernetes Secret:
- namespace:
venafi - name:
venafi-image-pull-secret
Step 2: Create a service account in the Certificate Manager - SaaS UI
If you haven't already done so, create a service account in the Certificate Manager - SaaS UI and obtain both the private key and client ID.
- Sign in to Certificate Manager - SaaS.
-
Click Settings > Service Accounts.
-
Click New.
-
Choose the Kubernetes Agent option from the Use case list, and click Continue.
The use cases available for you to choose depend on which Certificate Manager - SaaS components you have licenses for.
-
Enter a Name for your new service account.
-
Select an Owning Team. This team owns the machine you want to create the service account for.
-
(Conditional) Enter the number of days for which you want the account to remain valid in the Validity (days) field. You can select any number from 1 to 365 days. This step doesn't apply when creating a Custom API Integration service account.
-
Select the Kubernetes Discovery option from the Scope drop-down, and click Continue. Learn more
-
Select one of the following key generation options as required:
Click the Auto-generate a keypair and download the private key radio button, and click Create.
In the Credentials section, copy the public and private keys.
Important
Copy and store this private key securely as it cannot be recovered if lost. This is your only opportunity to copy this private key.
Store the private key as a
venafi-agent-private-key.pemfile, so it can be later imported to the cluster.Or:
Click the Generate your own keypair and upload the public key radio button, and click Continue.
In the Credentials section, provide the public key corresponding to the private key that your service will use. For your public key to be valid, it must be in PEM format and no longer than 2000 characters. The supported key algorithms are:
- RSA in 2048, 3072, or 4096 key lengths - ECDSA: P256, P384, or P521 - EDDSA: ED25519 -
Click Finish to create the service account and return to the Service Accounts page.
-
In the Service Account inventory page, locate the service account you just created. At the far right side of the screen, click the more icon, then click Copy Client ID.
Paste the client ID to a location you will be able to access later as it will be required as part of the Helm install command.
-
Create the
venafinamespace, and a Kubernetes secret containing the private key of the desired service account.oc create namespace venafi -
Import the private key you created and stored earlier in to the cluster:
oc create secret generic agent-credentials \
  --namespace=venafi \
  --from-file=privatekey.pem=venafi-agent-private-key.pem
Step 3: Create and apply the manifest
-
Create a manifest
venafi-components.yaml.gotmpl. You can use one of the samples below as a basis:venafi-components.yaml.gotmplapiVersion: installer.venafi.com/v1alpha1 kind: VenafiInstall metadata: name: venafi-components spec: globals: enableDefaultApprover: false imagePullSecretNames: [venafi-image-pull-secret] namespace: venafi useFIPSImages: false vcpRegion: US region: US certManager: install: true skip: false version: v1.20.0 venafiKubernetesAgent: install: true clientID: xxxxxxxx-xxxx-xxxx-xxxx-xxxxxxxxxxxx values: securityContext: runAsUser: xxxxxxxxxx tolerations: - key: node-role.kubernetes.io/infra operator: Exists effect: NoSchedule - key: node-role.kubernetes.io/private operator: Exists effect: NoSchedule version: 1.9.0Regional registries
The example above uses the Venafi US registry parameters. If you want to use a different Venafi registry replace
vcpRegion: USandregion: USwith the relevant regional repository value:-
EU registry
venafi-components.yaml.gotmpl... spec: globals: ... vcpRegion: EU region: EU ... -
UK registry
venafi-components.yaml.gotmpl... spec: globals: ... vcpRegion: UK region: EU ... -
Australia registry
venafi-components.yaml.gotmpl... spec: globals: ... vcpRegion: AU region: US ... -
Canada registry
venafi-components.yaml.gotmpl... spec: globals: ... vcpRegion: CA region: US ... -
Singapore registry
venafi-components.yaml.gotmpl... spec: globals: ... vcpRegion: SG region: US ...
For more information on Venafi OCI registries, see Configuring access to a Venafi OCI Registry.
venafi-components.yaml.gotmplapiVersion: installer.venafi.com/v1alpha1 kind: VenafiInstall metadata: name: venafi-components spec: globals: customChartRepository: oci://myregistry.example.com/charts customImageRegistry: myregistry.example.com enableDefaultApprover: false imagePullSecretNames: [venafi-image-pull-secret] namespace: venafi useFIPSImages: false certManager: install: true skip: false version: v1.20.0 venafiKubernetesAgent: install: true clientID: xxxxxxxx-xxxx-xxxx-xxxx-xxxxxxxxxxxx values: securityContext: runAsUser: xxxxxxxxxx tolerations: - key: node-role.kubernetes.io/infra operator: Exists effect: NoSchedule - key: node-role.kubernetes.io/private operator: Exists effect: NoSchedule version: 1.9.0Notes
Set the
spec.certManager.skipparameter totrueand thespec.certManager.installparameter tofalseif you have already installed and configured cert-manager.Use the
clientIDfield to specify the client ID of the Certificate Manager - SaaS service account for the Discovery Agent. This is a required field when installing Discovery Agent.Tip
For a complete list of CyberArk Certificate Manager Operator configuration parameters, refer to the CyberArk Certificate Manager Operator API reference.
-
-
Apply the manifest by running the following command:
oc apply -f venafi-components.yaml.gotmpl
Using a proxy server
Some Kubernetes clusters are configured to only allow Internet connections via an HTTP(S) proxy. If that applies to you:
-
Add the relevant regional API URL to the allowed domain list of your egress proxy. The options are:
- US region -
api.venafi.cloud - EU region -
api.eu.venafi.cloud - UK region -
api.uk.venafi.cloud - Australia region -
api.au.venafi.cloud - Canada region -
api.ca.venafi.cloud - Singapore region -
api.sg.venafi.cloud
- US region -
-
If using a Helm chart to install Discovery Agent, you can use of the following Helm values.
Configures the HTTP_PROXY environment variable where a HTTP proxy is required. For example:
http_proxy: "http://<proxy server>:<port>"Configure the HTTPS_PROXY environment variable where a HTTP proxy is required. For example:
https_proxy: "https://<proxy server>:<port>"Configure the NO_PROXY environment variable where a HTTP proxy is required, but certain domains should be excluded. For example:
no_proxy: 127.0.0.1,localhost,kubernetes.default.svc,kubernetes.default.svc.cluster.local
For more information about proxy server Helm values for Discovery Agent, see the Discovery Agent Helm values reference page.
Also, when the Discovery Agent requires a proxy for outbound connections, and the proxy uses a certificate issued by a private certificate authority, you can now add the certificate authority to a custom CA bundle that the agent will trust. The Helm chart supports specifying volumes and volume mounts to streamline this process. For more information, see the Discovery Agent Helm values reference page.
Step 4: Verify the installation
-
Verify whether Discovery Agent is successfully installed by running the following command:
oc get venafiinstall,podsSample output:
NAME                                                   STATUS   LAST SYNC
venafiinstall.installer.venafi.com/venafi-components   Synced   5h8m

NAME                                           READY   STATUS    RESTARTS         AGE
pod/cert-manager-7b67bb8b56-9tslt              1/1     Running   0                5h10m
pod/cert-manager-cainjector-6f55988c8f-qjj94   1/1     Running   0                5h10m
pod/cert-manager-webhook-75ddc44d97-8mmjq      1/1     Running   0                5h10m
pod/vcp-operator-6f76c5fb67-z2cm2              1/1     Running   0                6d8h
pod/venafi-kubernetes-agent-6cc4bc5967-2992j   1/1     Running   0                5h10m