Configuring authentication to Certificate Manager - Self-Hosted without storing secrets with JWT mapping
This is a secretless method for authenticating with Certificate Manager - Self-Hosted. With this method, you don't require an access token or password. This method is limited to Certificate Manager - Self-Hosted 22.4 or later.
The following example shows a cluster issuer resource that uses a Kubernetes ServiceAccount Token to authenticate to Certificate Manager - Self-Hosted.
Configuring the Kubernetes resources
-
Create a service account that the Connection resource can use to authenticate to Certificate Manager - Self-Hosted.
apiVersion: v1 kind: ServiceAccount metadata: name: application-team-1 namespace: venafi -
Give the venafi-connection service account the permission to create tokens for this service account.
-
Create a role that allows the creation of service account tokens for application-team-1:
apiVersion: rbac.authorization.k8s.io/v1 kind: Role metadata: name: create-tokens-for-application-team-1 namespace: venafi rules: - apiGroups: [ "" ] resources: [ "serviceaccounts/token" ] verbs: [ "create" ] resourceNames: [ "application-team-1" ] -
Link the controller's service account to the create-tokens-for-vault-sa role:
apiVersion: rbac.authorization.k8s.io/v1
kind: RoleBinding
metadata:
  name: application-team-1-sa-rolebinding
  namespace: venafi
roleRef:
  apiGroup: rbac.authorization.k8s.io
  kind: Role
  name: create-tokens-for-application-team-1
subjects:
- kind: ServiceAccount
  name: venafi-connection
  namespace: venafi
-
-
Create the Connection resource certificate request that has a reference to the CyberArk Certificate Manager - SaaS server and to the service account:
apiVersion: jetstack.io/v1alpha1
kind: VenafiConnection
metadata:
  name: application-team-1-connection
  namespace: venafi
spec:
  tpp:
    url: https://tpp1.example.com

    accessToken:
      - serviceAccountToken:
          name: application-team-1
          audiences: [ "tpp" ]
      - tppOAuth:
          authInputType: JWT
          clientId: cert-manager.io
          url: https://tpp1.example.com
Configuring Certificate Manager - Self-Hosted
In this example, it is assumed that your application teams have their own user account and policy folder in Certificate Manager - Self-Hosted.
-
In the Certificate Manager - Self-Hosted UI, create a user account and generate a strong random password.
Note
Even though we create a strong random password here, it is never used. It is only created because the Certificate Manager - Self-Hosted UI currently requires it.
For more information on how to create a user account, see the Certificate Manager - Self-Hosted Administration Guide.
You need to perform this step for every team that requires access to the Certificate Manager - Self-Hosted API server.
-
Create an application integration. Enterprise Issuer for CyberArk Certificate Manager needs permission to manage certificates using the Certificate Manager - Self-Hosted API, which corresponds to the scope
certificate:manage.Note
Enterprise Issuer for CyberArk Certificate Manager 0.11.0 and earlier also required the permission to revoke certificates, which corresponded to the scope
certificate:manager;revoke. With Enterprise Issuer for CyberArk Certificate Manager 0.12.0 and later, this permission is no longer needed.The following are the service account scopes required by different versions of Enterprise Issuer and Enterprise Approver Policy:
-
Enterprise Issuer for CyberArk Certificate Manager 0.11.x or earlier requires the service account scope to be set to
certificate:manage;revoke. -
Enterprise Issuer for CyberArk Certificate Manager 0.12.0 or later requires the service account scope to be set to
certificate:manage. -
Enterprise Approver Policy for CyberArk Certificate Manager 0.15.x or earlier requires the service account scope to be set to
certificate:manage;revoke. -
Enterprise Approver Policy for CyberArk Certificate Manager 0.16.0 or later requires the service account scope to be set to
certificate:manage.
If you will be using the Contact feature, which allows you to configure the email contacts to be notified per certificate resource or per issuer resource, you will need to give the permission to manage certificates as well as the permission to read configuration. The corresponding scope is
certificate:manage;configuration. You can learn more about the contact feature on the page Configuring email contacts when requesting certificates.For more information on API integrations, see the TPP Administration Guide.
-
-
Next, create a policy folder in the Policy Tree.
For more information on adding objects to the Policy Tree, see the Certificate Manager - Self-Hosted Administration Guide.
-
Grant the user you created in Step 1 the following permissions: Write and Create.
For more information on assigning permissions to an object in Policy Tree, see the Certificate Manager - Self-Hosted Administration Guide.
Create a JWT mapping
Note
This step is only required if you use the secretless JWT Mapping authentication method. This method is limited to Certificate Manager - Self-Hosted (TPP) 23.1 or later. Certificate Manager - SaaS is not yet supported.
-
In the Certificate Manager - Self-Hosted UI, go to Platform > API > Default Settings, and click the JSON web token (JWT) checkbox.
You need to create one JWT Mapping for each user account and per Kubernetes cluster. You need to know the issuer URL of the given Kubernetes cluster. You can find that by running the following command:
kubectl get --raw /.well-known/openid-configuration | jq .issuer -rIn the screenshot below, the issuer URL is
https://storage.googleapis.com/test_oidc_endpoint/ -
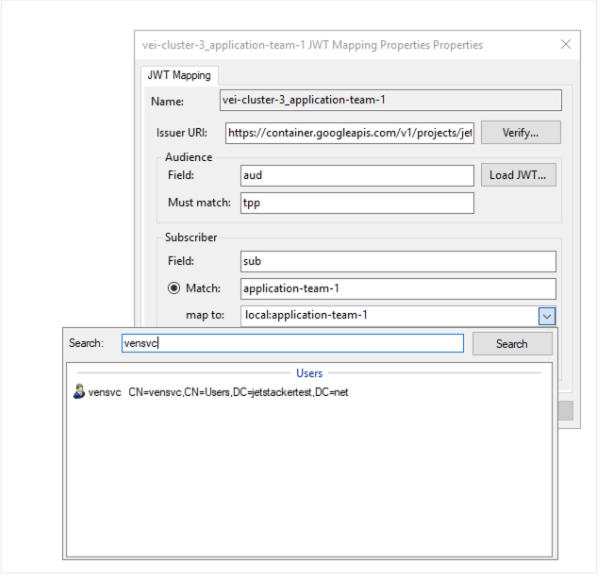
In the CyberArk Configuration Console, create the JWT mapping:
- Enter a Name. In the example below, the Kubernetes cluster name cluster-a with the Kubernetes service account name application-team-1 are used.
- Set the Audience field to
audand the Must match field totpp. You need to set this same value when you configure the Connection resource. -
Set the Subscriber field to
sub. The value must match the name of the Kubernetes service account you use in Connection resource. The format of the name is as follows:Put all of the Kubernetes service accounts meant to be used with the Connection resource in the namespacesystem:serviceaccount:<namespace>:<service-account-name>venafi.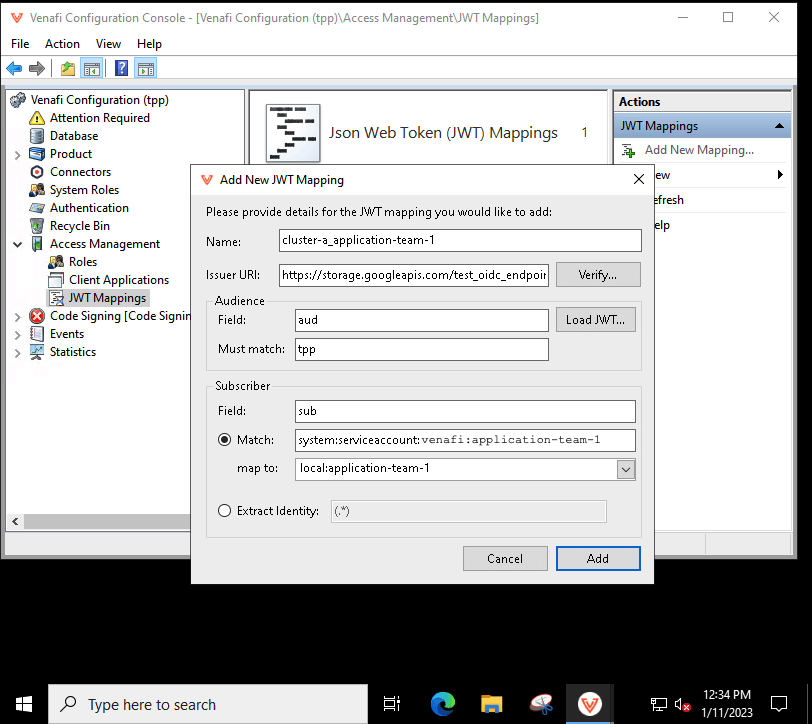
Note
The map to field is evaluated as a RegEx (regular expression), not as a string. For more information, see About JWT Mappings.
Mapping Active Directory users to a JWT Mapping
When launching CyberArk Configuration Console for the purposes of creating a JWT mapping, you may only see local Certificate Manager - Self-Hosted users/groups available to assign to the JWT mapping. This is because in order to search for Active Directory users to assign, you must launch an instance of the MMC snap-in as an Active Directory user.
The following instructions require you to use the mmc.exe, NOT the CyberArk Configuration Console
There are two methods you can use to enable a JWT mapping configuration to search and assign Active Directory users.
- Add the Active Directory user to the CyberArk Application Access Management API integration.
- Install VenafiMMC.msi on the administrator's workstation.
- Launch mmc.exe and add the CyberArk Access Management snap-in.
Or:
- Add the Active Directory user to the CyberArk Application Access Management API integration.
- Launch mmc.exe on the TPP server.
- Add the CyberArk Access Management snap-in.
You should now be able to search and map to an Active Directory user when creating a JWT mapping: