Setting Microsoft AD CS permissions
Certificate Manager - SaaS can manage certificates issued by Microsoft Active Directory Service (AD CS) if you configure AD CS to connect to Certificate Manager - SaaS.
When setting up AD CS with Certificate Manager - SaaS, it is essential to use the appropriate Service Account or User Account with the necessary permissions to ensure a smooth and secure connection.
This topic walks you through how to set up your Microsoft AD CS account so that it can integrate with Certificate Manager - SaaS. Go through these steps prior to setting up the AD CS certificate authority in Certificate Manager - SaaS.
Service Account Requirements
To connect Microsoft AD CS to Certificate Manager - SaaS, you must use a Service Account with the following permissions:
-
Read- Necessary for the Service Account to access CA configuration and certificate information, ensuring it can perform its duties correctly. -
Log on as a service- Required because the certificate service (VSatellite Worker, which is the bridge that allows VSatellite to interact with AD CS) runs as a background service. Without this right, the Service Account cannot start the service, leading to failures in certificate issuance and management. -
Issue and Manage Certificates- Allows the Service Account to issue, revoke, and manage certificates, which is essential for maintaining the CA and its operations. -
Request Certificates- Allows the Service Account to request new certificates, a fundamental function in certificate management.
Set AD CS permissions
Following these steps will allow Certificate Manager - SaaS to enroll certificates for any template that does not require a signature and to which its group has been given Enroll permissions.
-
Create an Active Directory group.
-
Create an Active Directory user account to use when enrolling with Microsoft AD CS.
About the term user account
In this context, a user account is synonymous with service account. In Windows, a service account is just a user account that represents an application rather than a person.
-
Add this user to the group you created.
-
Using the Certification Authority MMC snap-in, right-click on the CA name and select Properties. On the Security tab, add the group and grant it
Read,Log on as a service,Issue and Manage CertificatesandRequest Certificatespermissions.Adding MMC snap-ins
If you're not familiar with using MMC snap-ins, see Adding an MMC Snap-in below.
-
Using the Certificate Templates MMC snap-in, right-click on a template that Certificate Manager - SaaS will enroll and select Properties. On the Security tab, grant the group
ReadandEnrollpermissions. Repeat this step for all templates that this group will enroll. -
Create a Microsoft AD CS Certificate Authority in Certificate Manager - SaaS. Certificate Manager - SaaS will automatically test that the used group can enroll certificates for the specified templates.
What's Next
You're now ready to set up an AD CS certificate authority in Certificate Manager - SaaS. Have the following AD CS information ready before you begin:
- IP or hostname of your Microsoft AD CS server
- Username and password for the AD CS account you set up in these steps
-
Microsoft AD CS Issuing Certificate Common Name
Where can I find the Common Name?
There are two ways to obtain the Common Name of the Issuing Certificate:
-
Open the Issuing Certificate, go to the Details Tab and check the CN value for Issuer.
-
From the Certification Authority MMC snap-in, expand the root node, and the name of the CA itself is the CN of the Issuing Certificate. In the example below, the CN is
VaasQATestCA.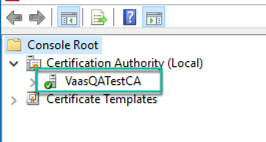
-
Adding an MMC Snap-in
If you're unfamiliar with how view the MMC snap-ins referenced in the steps above, follow these steps.
-
On your Windows server, select Run from the Start menu, and then enter
mmc. The MMC opens. -
From the File menu, select Add/Remove Snap-in. The Add or Remove Snap-ins window opens.
-
From the Available snap-ins list on the left, select the snap-in that you want to add, and then click Add.
-
For the Certificate Authority MMC snap-in, select the computer you want the snap-in to manage. If you're performing these steps from your AD CS server, click Local Computer. Otherwise, select Another Computer and specify your AD CS server.
-
Click Finish, and then click OK.